Over the last year and a half, I’ve spent a lot of time figuring out how to create high quality explainer videos. Ten of my most successful ones can be seen in the FlingOS tutorial series on YouTube. So here follows my attempt to share what I’ve learnt, in an easy-to-use guide for creating high quality tutorial videos.
I created a short summary video of what’s in this article:
Before you start…
…you should have a reasonable expectation of what you are likely to achieve and how far you’re willing to go in the name of “quality”. Is this just a casual video for friends? Or are you really aiming for that top quality tutorial experience for your viewers?

It’s important to realise that, as with anything, there are three things you can optimize: time, money and quality. This tutorial will teach you how to achieve pretty good quality, but it comes at the expense of time (~30 mins per minute of created video, once you’re practiced!) and money (£0 to £400 depending on your current software and hardware, around £230 if you’re a student).
If you’re creating a casual video for friends, you probably don’t need to go to this much expense. But if you’re creating good videos for anyone on YouTube? Then you’ll definitely want to save yourself time and achieve better quality by buying the correct tools for the job.
One final thing: expect to create a rubbish video first time around (and probably second time too). By the third attempt, you’ll get the hang of it. You’ll then need to spend some time practicing with the tools and repeating your workflow to get quick at it.
Overview
I’ve tried to break this down into the various steps I take to produce a really good video series.
- Steps 1 to 4 : Do for each video/series during planning phase
- Steps 5 to 10 : Do for each video during creation phase
- Steps 10 to 12 : Do for each video during publishing phase
- 13 : Useful tips and tricks

Each “phase” referred to above happens discretely in one unit. Don’t try to overlap them too much or you’ll find things get messy (either in the content or in your workflow - both will be noticed by your viewers).
Planning occurs at the start. By planning all your videos up front, you can create a consistent style, tempo and structure across all your videos.
Creation is the phase of making each of your videos before you put them online. By creating them in a batch, your videos will be consistently styled, animated, etc. and you can enter the publishing stage knowing everything you need is ready - you won’t be rushing any videos for that “weekly publication schedule” you promised your viewers.
Publishing is the phase where you put everything online. For a series of videos, you may want to do this all in one go, or just publish one video per week. Maybe look at similar video series to what you’re doing to find out what works best with your audience?
Choosing your topic
Hopefully you already have some idea what you’re going to create your video(s) about. If not, you should probably go think about that then come back to this guide later.
Once you’ve chosen your basic topic, you need to figure out what it is you’re trying to show. Are you demonstrating something from that topic? Are you trying to teach the basic concepts? Or are you trying to show the application of a topic? Perhaps you’re just trying to make it look cool?
Whatever your aims may be, write them down in clear, concise bullet points at this stage. If you are dong a series of videos, do this for the whole series. Keep it to 5 bullet points. You should think about what it is you want to convey and what you want your audience to take away from watching your video (a happy memory or some new knowledge?)

Now you’ve got an overall view of what you’re trying to achieve. The next step is to think about the specifics. Write down 5 to 10 bullet points per video of things you want to demonstrate, explain or do during each video. Each bullet point will correspond to roughly 1 to 3 minutes of video, depending on the complexity of what you’ve chosen.
If you’re planning a series of videos and aren’t sure how many to plan, you should write down bullet points for each thing your series should contain. Try to place them in a logical order - an order which someone new could follow from beginning to end and not have to mentally piece things together too much. Now divide your list into groups of 5 to 10 bullet points and see how many videos that adds up to. More than 10? That’s going to be a lot of work!
Target audience
After deciding what it is you want to present, the next stage is to consider your target audience.

Why didn’t we do this before planning the content?
It is often tricky to decide on topics you want to include in your video if you’re busy thinking about who is going to view it. A topic ought to have important information on its own, independent of the target audience.
Your target audience affects how you present the topics, but not what topics you choose to present.
For example, a video on quantum physics might like to convey three important topics:
- Small things behave differently to big things
- Small things make up the world
- Small things can be in many states at once until we observe them
A video aimed at University Physics students may choose to include all the details of classical vs quantum mechanics, subatomic particles, probability density fields and wave functions. But a video aimed at primary school kids probably won’t go into that much detail. Instead, it may present the same topics in terms of a river vs a stream, lego bricks, and cats in sealed boxes (or perhaps something less morbid).
What do you need to know about your target audience…?
…not their age. Though it may help you to gauge the thing you do need to know: their prior knowledge/experience.

You need to know what knowledge and experience you expect your viewer to have before they start watching. This is essentially their “skill level” and it consists of many parts.
Some aspects of your audience’s skill level that you may want to consider are: reading age, prior knowledge of the topic, work experience level, special needs and disabilities (e.g. are you going to make an effort for people with dyslexia), ability to concentrate (a.k.a. attention span), etc
You will also need to know two more things: how much time your audience has or is willing to spend watching your videos, and how interested they are in your topic(s). You can gauge these by looking at responses to videos on similar topics to yours online and by asking your friends/colleagues.
Choosing a style
You know your topics and you know your audience, now it’s time to choose what style of video you’re going to use.
This choice is largely personal preference. Videos come in many styles most of which are successful. Everything from whiteboard explainer videos to 2D animation to cartoons to just standing in front of a camera and talking.
Whatever you choose, you need to be comfortable with it and it needs to present your content in a format that is useful to your viewers. If you’re expecting viewers to copy down text, code or similar, then a 2D animation of text and images is going to be better than a whiteboard explainer. If you’re just trying to produce a short, chatty video about a topic, then standing in front of a camera and talking may be the best, most engaging option.
Keep in mind that your choice of style may affect what equipment you need. 2D Animations require good software but don’t need a video camera. Whiteboard explainer videos need either a good graphics tablet or a good video camera and physical whiteboard. I’ll cover choice of software and hardware for some of these styles later in this guide.
Structuring your video (or series)
Designing a series
(Skip this section if you’re just planning one video at a time.)
Hopefully you’ve already followed the previous steps for choosing your topic and deciding the number of videos. But that may not have given your series much structure.
Consider the bullet point details of the topic(s) you’d like to cover. Draw arrows from items which require certain knowledge or understanding to the items which introduce that knowledge or understanding.
This ought to show you what order information needs to be introduced in your series. Hopefully at least some of the items have no dependencies as they rely only on prior knowledge.
Now reorder your bullet points into the best order for teaching the content. Try to keep items as close to their dependencies as possible. This way your viewers won’t forget what you taught them between videos!
Designing a video
There are a number of important design points. Firstly, keep things as simple as possible. Making your video visually complex is more likely to distract or bamboozle your viewer than to engage and excite them.
Secondly, remember that every video should have some form of continuity with your other videos, even if they’re all done as “one-offs”. Try to develop a personal style of welcome and goodbye for your videos.
Thirdly, consider what your audience is expecting in terms of professionalism of your video. You may want to create a chatty, informal video or you may want to aim for a formal, “professional” video.
Lastly, before we go further, remember to be careful of license rights. If you’re planning to use video clips, images or quotes in your video, make sure you have the right to do so. Pexels.com is a good place to find CC0 images that you can use without attribution or limitation.
The Script
The script is going to be the most important part of your video. A great script can make up for any poor video editing.
The script is also what will determine whether your video “hangs together”. That is to say, whether it is coherent, interesting or funny, meets the target audience requirements and conveys everything you intended about your chosen topic.
Every video has four parts…
Every good video has at least four basic parts. These are what separate the average video uploaded to YouTube unedited from a mobile, with the higher standard of videos that get the majority of views.
- Intro
- Content
- Summary
- Outro
The introduction serves as a welcome, a clarification of what your video is about, a continuation from your previous videos (even if they’re all “one-offs”) and the first impression a viewer receives. A good first impression (and if the video is actually about what a viewer was looking for) will keep people watching.
Next comes the content, I think you probably know what that means. The summary is equally obvious - summarize the important information that you want your viewer to remember after the video ends.
The last item, the outro, is your chance to say goodbye, say thanks for watching and try to get viewers to come back for the next video. This is often the point when creators ask people to like/subscribe/share their video. You may also want to ask for support and thank anyone who helped you make the video.
Here’s a few examples of videos that show each of these four parts:
Lay down a plan
Before you begin writing, create yourself a solid plan. If you’ve followed all the steps thus far, you should already have a solid list of bullet points for what your video is about. Start with these bullet points in a word document or other editor. Don’t worry at all about formatting your script at this stage.
For each bullet point, break it into the most detailed sub points that you can. You should be able to read these sub points and have all the detail of what your script is going to say.
For each major point, ensure your detailed bullet points contain any key words that you wanted to include. For example, particular terminology or acronyms.
Lastly, go back through your bullet points and make them as clear and concise as possible. You don’t want excessive adjectives or “flowery” words at this stage (if ever).
Fleshing it out
Take a copy of your bullet points from the previous part. You’ll want to keep these for later when you come to do the video recording and editing.
Now, for each detailed bullet point, expand it into a brief sentence or two or three (but at most three). If you need more sentences than this, your bullet points weren’t detailed enough to start with.
Write your sentences as though you were talking to someone, since that is what you’ll be doing in the video. Unless you’re doing a technical demonstration or corporate video, in which case I have to wonder why you’re reading this blog post?
Remember to consider the pace at which you are going to speak. You will need to talk at about 3/4 or less of your ordinary talking speed in order to come across clearly. This will also influence how long your sentences are - make sure you’re not going to run out of breath!
Don’t worry if your sentences don’t link together at this stage.
Compare each of your sentences to the original bullet points. Check your sentences are correct and contain all the intended information. Again, try to make your sentences clear and concise and minimize the number of uninformative adjectives.
Now go back and make your sentences link together using ordinary adjoining words.
Lastly, here’s a few things to check for when reading your script:
- Expand numbers to words, it’ll make recording the script much easier, especially long/big numbers or numbers with repeated digits!
- Avoid double negatives
- Avoid complex sentences or bracketed expressions
- Avoid “if” conditional sentences when possible - they’re frequently misunderstood by viewers
- Read sentences out loud - make sure they aren’t too long (read them in one short breath)
- Keep paragraphs short - you won’t be able to keep your place during recording. Just split paragraphs arbitrarily.
- Add line numbering if possible - this helps a lot if you’re getting anyone to review your script. Line numbers on every line or every 5th line is fairly normal.
- Use concise verbal explanation which can then be backed up by visual demonstration
- Avoid creating long sections which will need to be tightly tied to particular parts of the video (e.g. complex sequences of animation tied to verbal description) - these are hard to create, take a long time and are prone to errors
- Avoid describing positions of what will be shown - these often don’t work out when you go to create the video!
- Avoid relying on sections of video without words to fill gaps - filling the silence is difficult to do well and often a verbal description is useful to viewers.
Thinking about visual content
Okay, now it’s time to start thinking about the visual content of your video.
For an explainer video, the visuals are there to support what you’re explaining. They should be sharing the work with the script, and probably doing the smaller part of the work if your script is well written.
There is a balance though - for explaining software, screen recordings can be very effective. Animations for demonstrating verbally described systems can also be very effective.
Throughout your video, consider showing (short versions of) your original bullet points and highlighted keywords. This helps the viewer pick up on important information. This can sound like “produce a slideshow” but using sensible layout, neat animations and relevant imagery, you can avoid that “slide show” look.
Remember that text is distracting when it’s longer than 5 words. If you want to put more text on screen, introduce it slowly (one short line at a time) and don’t put it in bright or distracting colours.
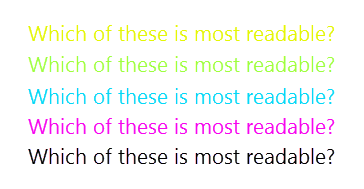
Make sure text is clearly visible. Avoid yellow and light green. If you’re overlaying text on an image and are struggling to find a contrasting colour, it’s best to place a translucent black or white rectangle behind the text to improve the contrast.
When possible (and not tacky) use images to represent ideas instead of words. Viewers find images less distracting and easier to process. Consider building up images or diagrams by fading in parts or animating in sections to build it up. If you suddenly place a complex diagram on screen, viewers will stop listening and start trying to make sense of the diagram. Fading in separate parts breaks it down for your viewers.
Animation is a powerful tool but should be used sparingly and consistently. Treat animations like colour - a particular animation should be used for certain implied meaning or grouping. Fade can be used almost anywhere to good effect. Fancy animations (like “doors”, “checkers”, and “zoom”) often look tacky and distracting.
Animation can be used to break things down or to demonstrate what is being explained. For example, a long list can be broken down by fading in each item as the narration mentions them. If you’re creating a system description, you could fade in each component box then “expand” arrows between boxes as they fade in to show links between components.
Lastly on animations, if you’re trying to explain a complex, multi-part concept, you can fade in the first points for the first part of the concept, group them, then shrink the group and replace it with a single label. Do this for each part of the concept and link shrinked groups with lines or arrows if required. The end result will be small boxes with short labels that summarise everything in you complex explanation. The boxes/labels serve as reminders of everything they represent, which allows a viewer to piece things together in their mind.
Lastly, if you want to impress and entertain, feel free to use fast and/or complex animations. But if you want a viewer to really remember something, stick to simpler, slower animations and let your visuals and audio narration do the work. In general, fading, moving and scaling are more than enough effects and will keep things looking professional.
Not in that “writing mood”?
It can be very difficult to get into the right mood for writing. The “right” environment and mood is particular to every person so what follows here is a mixture of general advice and personal experience.
First off, allow yourself to write when you do feel like it. Don’t get hung up on the “right” hour of the day to do it. If you feel like writing at 2pm, 6pm or 2am, just go for it.
I find that once I’ve started writing I shouldn’t stop. If I stop for any significant length of time, I lose my train of though and my motivation and can’t be bothered to start typing again. In essence, my creative flow stops. (I have to remember to drink and eat enough and take breaks to rest my eyes.)
The right music can be all you need to get into the writing mood. Try finding something that you can listen to without getting drawn into it but also without finding it boring. This can be enough to let your mind relax and start to come up with ideas (the “creative flow” so to speak) without being distracting.

I find taking a shower with some “Acoustic Covers” (playlist on Spotify) can put me in the right mood for writing. In the shower, close your eyes and think about the topic you’re going to write about. Think about how you would explain it to another person, then turn that into your detailed bullet points for writing.
Lastly, if you’re stuck for what to write, try explaining the topic to a friend. This will help you verbalize the explanation that you can later write down. If you ask for constructive feedback, you’ll also find out the weak points of your explanation. Remember to note down the structure of your explanation and any feedback from your friend immediately after (or better yet, during) your explanation or you’ll forget what you said or the structure of your explanation.
Visual content planning
By now you should have a good idea of what your video is going to contain. At this stage, you should write down bullet points of the order that things will appear on screen and how you plan to transition between stages of the visuals. This will help you when recording the audio as you’ll know roughly how long to pause between words, sentences and paragraphs.
You should also check that everything you plan to put on screen is going to fit. Avoid using smaller than size 16pt, and in general plan to use size 36pt, 44pt, 56pt and 72pt. That sounds big, but when someone is watching on a mobile or half a screen on a laptop (quite common) it will be a good size to be easily readable. You don’t want to force your viewers to use full screen just to read your text!
Images should fit on screen, be of good quality and clearly visible. For the most professional look, use 1080p video or better when editing and make sure images are of at least equal resolution to what they are displayed in the video. When making images bigger or smaller in the video, consider using proper image editing software to resize the image then include those in the video instead (using clever animation sequences to hide the transitions between versions of the images). This will keep images in the best quality. Most video editing software doesn’t do a good job of scaling images.
With visuals on screen, “less is more” is a good principle. This means minimizing text, shapes, lines, arrows, images, etc. For screen recordings, use the largest size possible of the relevant area of the screen and crop out irrelevant areas. Use mouse-tracking to stay zoomed in on the relevant areas of the screen when possible (Camtasia is very good for this).
The Audio
Here’s where the fun starts - recording your audio!
Hardware
Here’s a simple fact: If your hardware isn’t good enough, no amount of software is going to fix it.
Quite simply, if your hardware doesn’t pick up what you’re saying properly, you can’t “recover” that using software - you can’t recover what isn’t there! The best you can do is eliminate noise and see what you’ve got left. Equally, if your mic is of poor quality or badly set up, eliminating noise can be very difficult as it becomes blurred with your actual voice.
So here’s the deal: You need to get yourself a decent mic, which costs a bit, but the software you need for audio recording and editing is free!
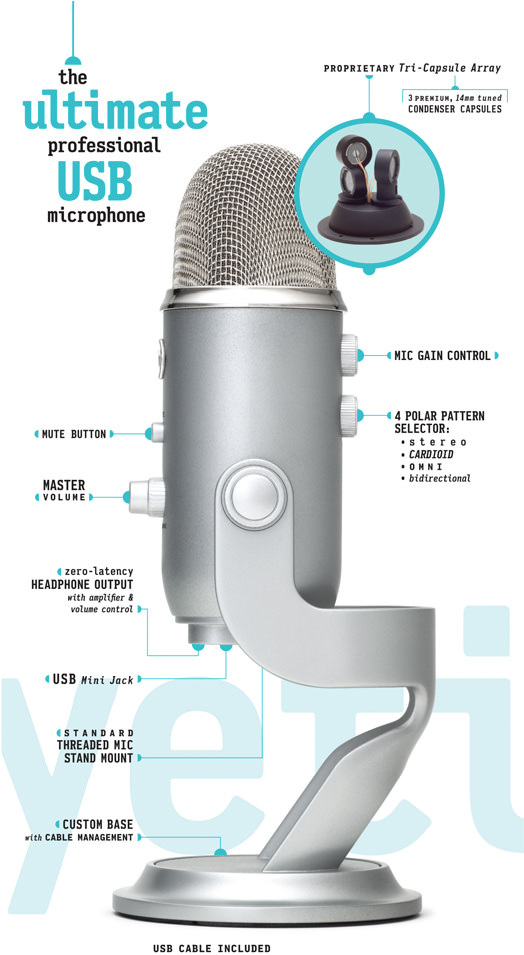
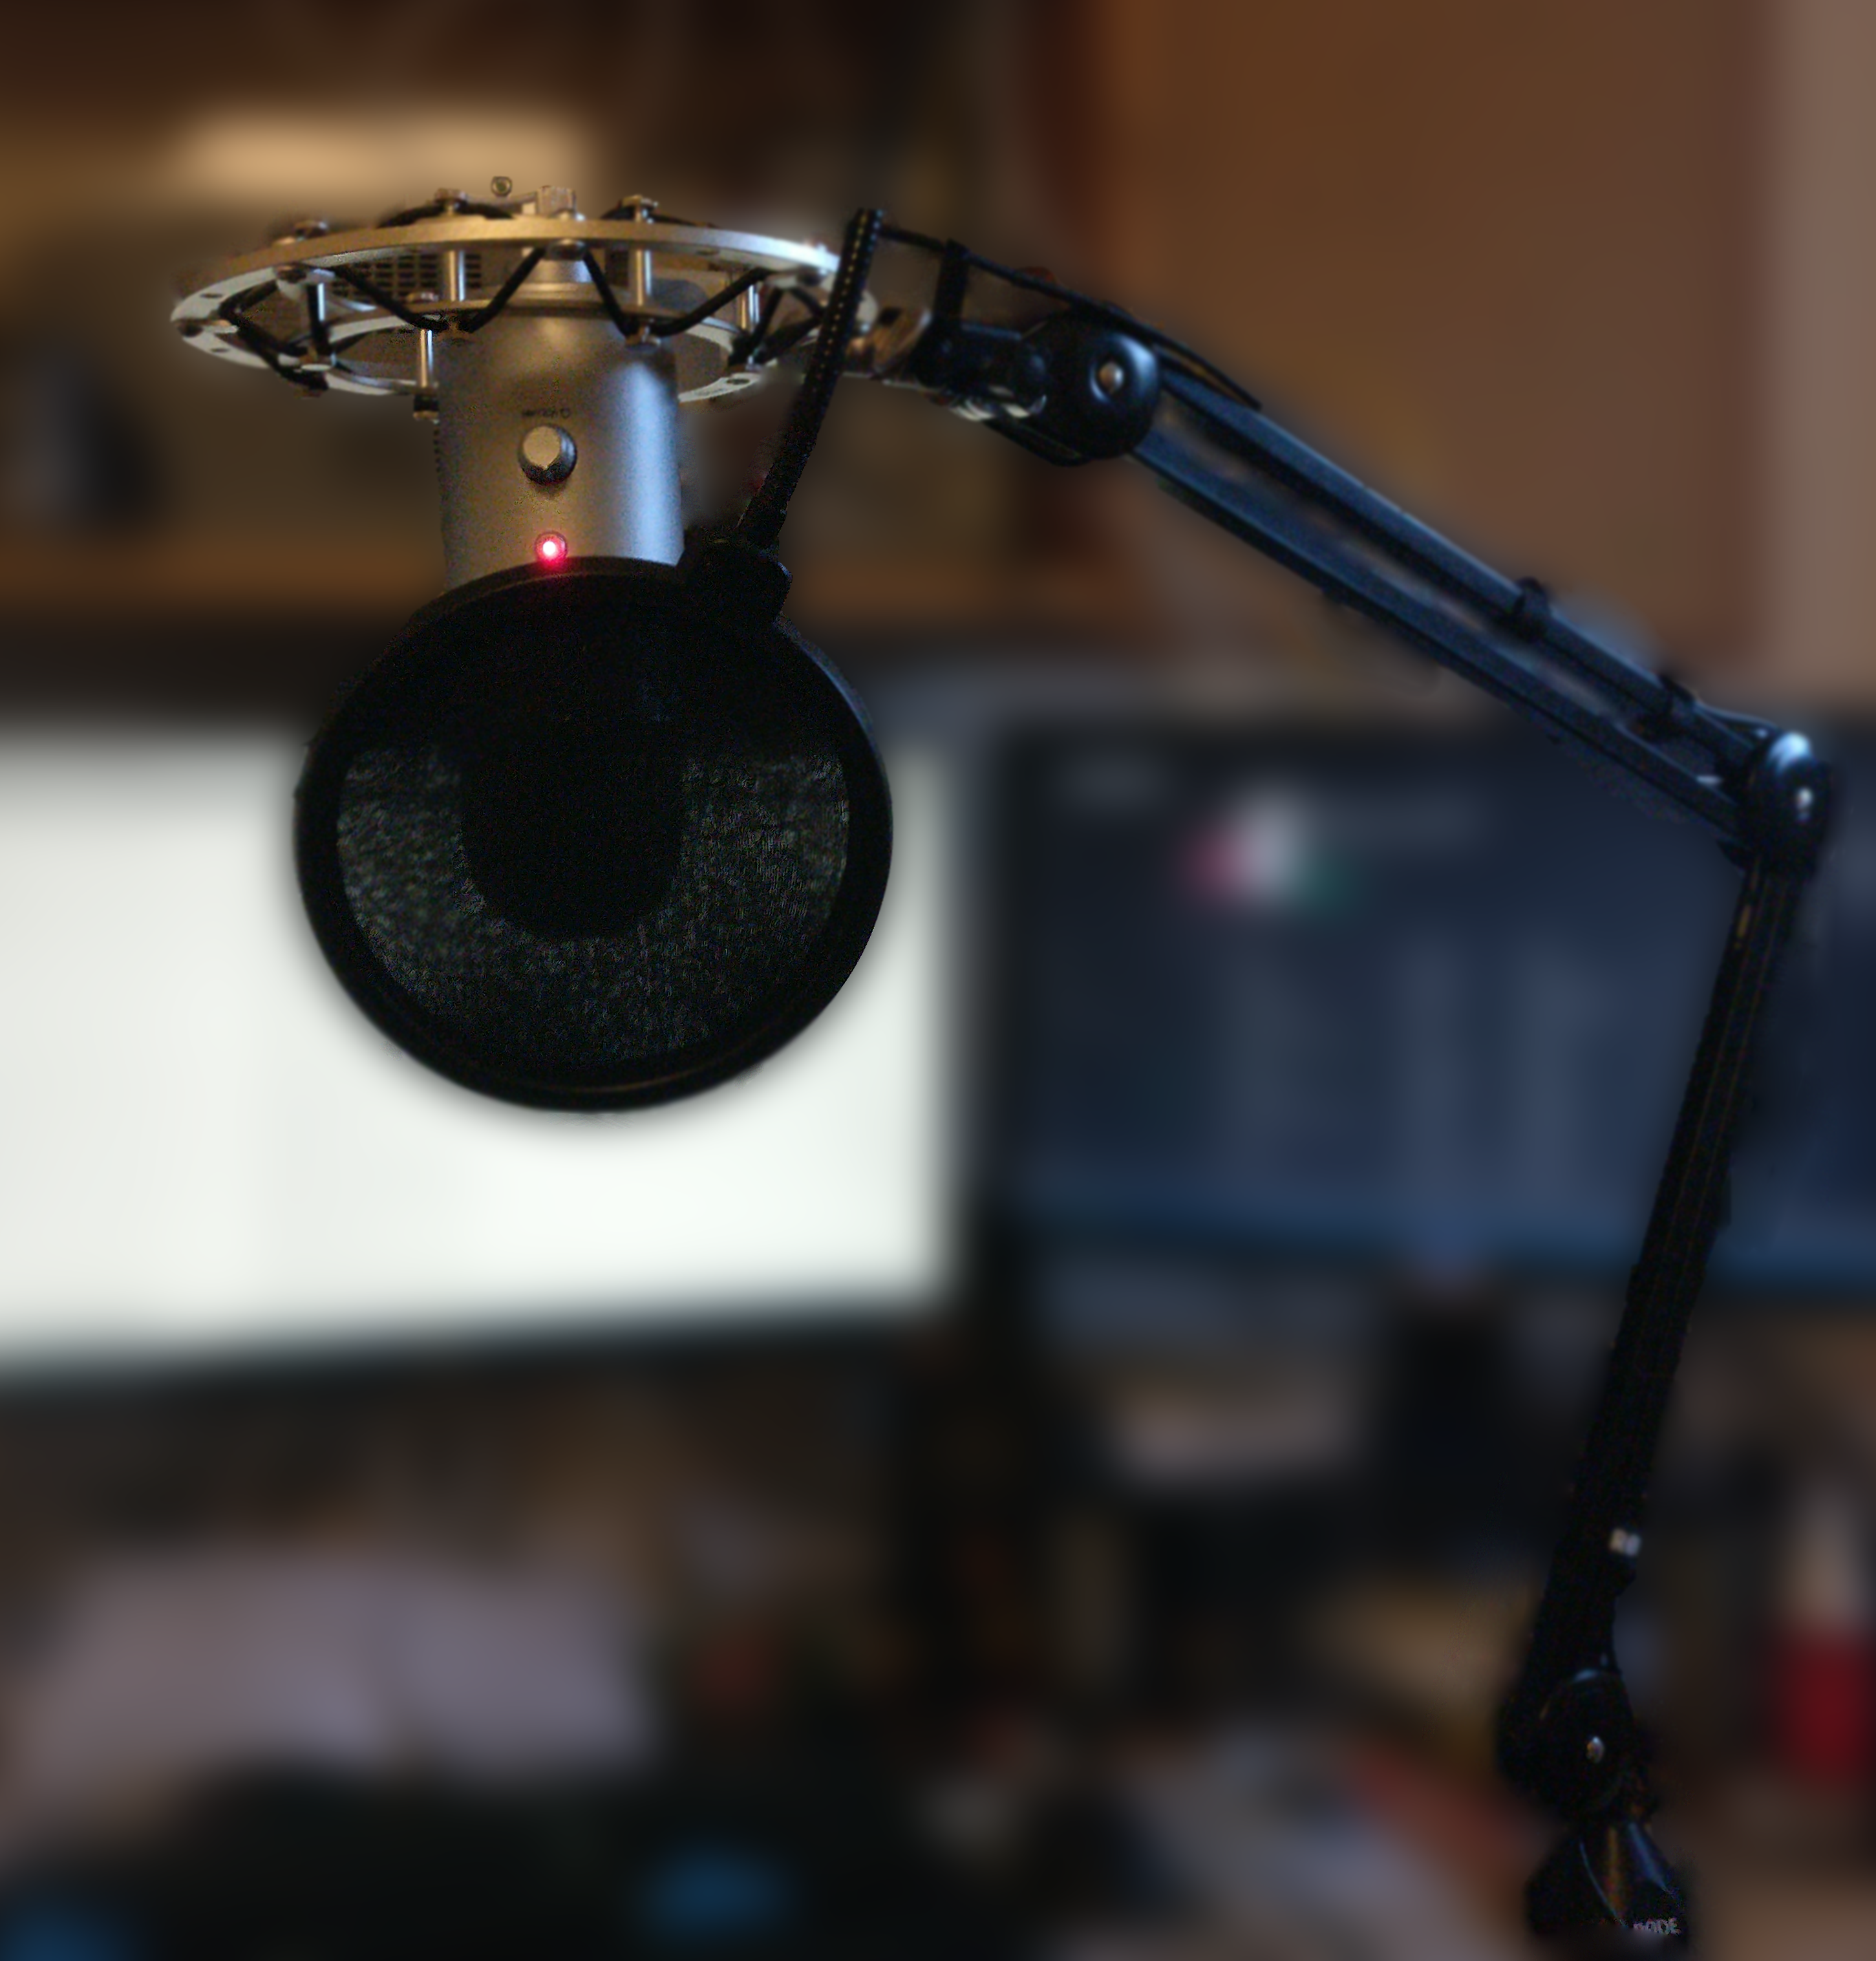
Hundreds of thousands of words and probably thousands of videos are available online about the “best” mic setup. But for the versatile uses of “explainer” videos, I’ve found the Blue Yeti mic to be very good. I recommend you read the manual on how to use it properly. With a desktop stand and shock mount you can minimize low-frequency noise from your PC/laptop and other things like road traffic.
USB mics like the Yeti are really good for home or low-cost work setups as they don’t suffer from electronic noise in the analogue audio cables of other mics. For analogue input mics, you want something better than a 3.5mm input mic jack on a PC to avoid horrendous noise. That takes you into the realm of audio cards, mixing desks and a deep rabbit hole of expense.
The Blue Yeti is around £80 on Amazon (as of 2016-12-29). You can find cheaper complete packages for around £30 but you’ll struggle to match the quality and versatility of the Yeti.
Software
This is the easy bit. For audio recording and editing, not much beats Audacity. It’s completely free and has a tonne of built-in features and extensions that make editing audio to a professional quality really easy.
Recording
It’s time to record your audio. So read the manual for how to use your mic properly and then proceed. Make sure you’re on a seat that isn’t going to roll around and won’t creek at inconvenient moments. Stick a “Do Not Disturb” post-it note on your door and relax, you’ve done all the hard work already for this bit.
Eliminate as much noise from your environment as possible and turn the gain right down on your mic. If you’re using the Blue Yeti, put the mic into Cardioid mode and point it directly upwards so it’s vertical (the body of the mic should point perpendicular to your mouth, not pointing towards or away from it). Make sure the correct side (the button side on the Blue Yeti) of the mic is facing your mouth. Lastly, ensure the mic isn’t muted and that your computer recognizes the mic as an input.
Now open up your script and resize to a comfortable reading size. You shouldn’t have to lean in or out to read parts of it and you should be able to see three or four paragraphs on screen at once.
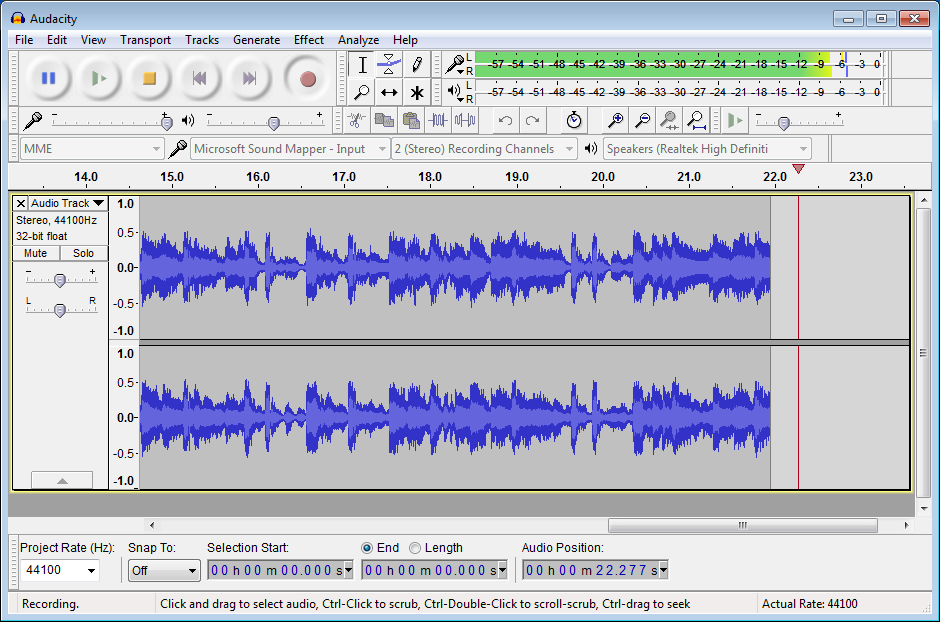
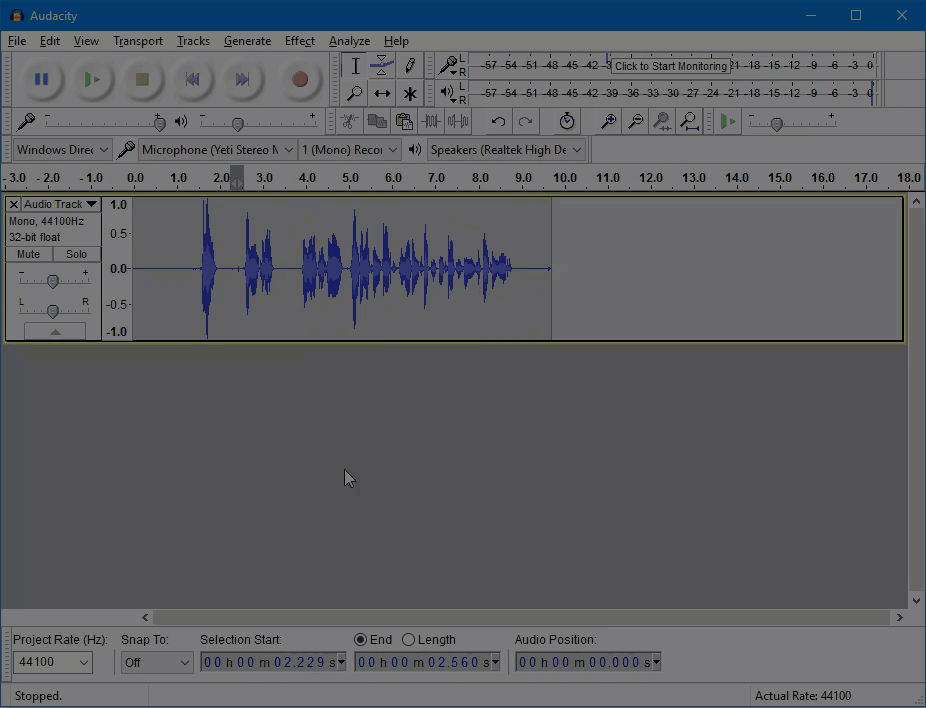
Open Audacity and make sure the correct mic input is selected. You might also want to check which output is selected for the speakers.
Hit the red Record button and sit there, in “silence” for at least 10 seconds. Breathe quietly while recording or your viewers will curse you. Now just start reading your script out loud.
Try to be natural; don’t be afraid of re-wording things as you’re reading them to make them flow better. Remember to speak relatively slowly so that all your viewers can keep up (no matter what other things they’re doing while watching your video).
If you make a mistake, don’t stop the recording. Stop speaking, gather your composure and begin the sentence or paragraph again. Don’t try to start mid-sentence or mid-word and don’t try to correct words - this will be impossible for you to edit together cleanly later.
When you first start out, keeping a consistent tone and rhythm to your recording can be difficult. Practice repeating sentences so they sound the same every time. Otherwise your narration will sound all over the place which makes it harder to follow.
Remember to put emphasis on the correct words in a sentence. Emphasis on the wrong words or wrong tone to a word can confuse viewers as to what you were trying to say.
Record your entire script in one session. Don’t split it over multiple days or different points during the day. Your voice changes from day to day and it is very noticeable when clips from different times are edited together.
Lastly, maintain a consistent distance to the mic and a consistent volume of your voice. Otherwise your audio will be difficult to edit to a consistent volume, which in turn makes it hard for viewers to listen to. Some of this variation can be eliminated using dynamic range compression in Audacity or (as I prefer) in the video editing stage (Camtasia Studio is good at this). A “pop filter” is a good investment (and/or possibly a windscreen too) to avoid loud “p” and “b” sounds and breath blowing across the mic.
Initial clean up of the sound
If you try to play back your recording straight away, you’ll probably find it’s very quiet and somewhat noisy. Not to worry, we’re going to fix this now! Don’t remove mistakes from your recording at this stage, we’ll do that after this step.
Start by “normalizing” your audio. Ctrl + A to select all the sound then Effects - Normalize. This will amplify your audio so that the loudest point in your audio is at just below the maximum volume and everything else is scaled proportionally. This makes all your audio louder so that it can be heard without difficulty but it doesn’t remove noise. All the noise is amplified with everything else!

Not to worry, we’ll do our best to eliminate noise now. This is where that 10 seconds of “silence” at the start of the recording comes in. Select the middle 5 seconds of this “silence”. Then go to Effects - Noise Reduction, then (in the dialog window), click Get Noise Profile. Press the Enter key to make your selected section of “silence” the noise profile. This is a sample of the background noise in your recording used to eliminate noise throughout your recording.

Now, click Ctrl + A to select the whole recording then go to Effects - Noise Reduction *again, leave the default settings and click *OK. Audacity will now use the noise profile to reduce noise from your whole audio sample.
When you play your recording back ,it should now be louder and without much noise (not all noise can be eliminated).
Removing mistakes
At this stage, go through your recording and remove any mistakes you made. Delete whole sentences to keep consistency. Don’t worry about deleting long pauses between sentences or paragraphs just yet - concentrate on eliminating mistakes to get the best version of each bit of speech.
Cleaning up the sound further
Now go through your audio and remove clicks, clacks and ticks. Particularly around words, clicks and clacks from your tongue or similar can be very noticeable and annoying for listeners.
To eliminate these annoying sounds, don’t use the Delete key, as this will throw off the intonation of your speech. Instead, reduce their volume. Use Effects - Amplify and “amplify” to the lowest possible volume (e.g. -50dB). Neat trick: you can use Ctrl + R to repeat the previous effect, so select your bit of audio, amplify to -50dB then, for the next selection, just use Ctrl + R to repeat the amplification of -50dB.
Adjusting timing
At this stage, play back each paragraph and adjust the timing of sentences (pauses between sentences) by adding or removing silence. Then adjust the space between paragraphs.
Reducing dynamic range
I use Camtasia for this (not sure how to do it in Audacity) but some other audio editing software offers it. Essentially, reducing dynamic range means making quiet things louder, loud things quieter, and leaving middle-volume things the same. The end result is that all your audio comes out at a similar level. You still want some variation but too much variation can be hard to listen to.
Typically I use Camtasia 8’s “Medium volume variation” setting under the Sound options for my audio clip. Sometimes only “Low volume variation” is required. In Camtasia 9, go to Audio Effects and apply the “Volume leveling” effect.
The Video
This is the last stage of creation and editing. It’s almost surprising how much work goes into making a video that isn’t actually video editing! Anyway, onto the “how tos”…
Software
When it comes to video editing, software is key. While there is some free video editing software out there, I’ve yet to find any that match both the quality and ease of use of Camtasia Studio. I use versions 8 or 9.
Camtasia Studio also comes with Snagit, an excellent screen-grab package. The two programs also come at a reasonable student price of around £150 (at the time of writing).
The rest of this tutorial will effectively assume you’re using Camtasia and Snagit. Honestly, they’re worth the investment. Even if you can match the quality using free tools, you will not match the ease of use. That will mean you spend a lot more time editing and end up wasting tens of hours just on one video.
Images
Images are an important part of any video. You can use three forms of image:
- Photo / Picture : .jpg, .raw Great for showing physical objects, places, faces, etc. Not so good for diagrams, icons, text, screenshots
- Graphic / Diagram : .png, .svg Great for screenshots, (complex) diagrams, text (if part of the image) Not so good for photos of the real-world, images with lots of variation / colours
- Vector graphics (optionally with animation; made using shapes & text inside Camtasia Studio) Great for (animated) text, simple diagrams, text, bullet and numbered lists, simple shapes, lines/arrows Not so good for anything else
Always remember to use photos of at least the same size as they will appear in your video. In general, try to match the resolution (width/height in pixels) of your image to the size it appears in the video.
Camtasia is not so good at scaling images down in size by more than about 50% (and never scale-up an image in Camtasia). Use Snagit or Photoshop or Paint.NET to resize your image
Photoshop is the best option for image editing but is rather expensive. Paint.NET is a good option for photo editing, Snagit is good for graphics editing.
If you’re animating photos or graphics and want to resize them, there is a neat trick you can do to retain the quality of an image-editor-resized-version despite the animation.
Make two versions of your image at the two different sizes you want to display your image at. Add the first image to your video and animate it so it resizes to the second size. Then, add the second (resized) image to your video so it exactly overlays the first image after the animation. Lastly, apply a very short fade-in effect to mask the transition from one image to the other.
When using photos or screenshots, ensure you minimise the amount of “other stuff” in the image. “Other stuff” can be very distracting for viewers and viewers might not focus on what you intended.
If you want to leave screen location context in your images but remove some of the distracting “other stuff”, use Snagit to apply a Blur box over the parts of your image you didn’t want viewers to focus on. This can also be useful for hiding personal information in screenshots like bookmarks or your username/email for website.
With screenshots, remember to remove personal information when necessary. For example, hide bookmarks bars, blue out email addresses and usernames and remove the Windows Taskbar from the image if it’s visible.
Snagit makes taking screenshots of parts of or whole windows very easy as it automatically detects “regions” of the screen. TechSmith have excellent tutorial videos on how to do this.
Use images to support what you are saying, not to replace the explanation. If you expect a viewer to understand a diagram, introduce bits of it slowly or allow them twice as long as you think the slowest person might take to fully understand the diagram.
Text
Text can be tricky to get right in a video. Too much and it is distracting. Too little or none at all might be the right option but sometimes text can help remind viewers of things you’ve said or aid the clarity of a diagram.
There are some golden rules with text that should never be broken:
- Never put text in yellow or lime green - these colours are universally unreadable
- Always use a contrasting colour from the background colour or image
- If you can’t find a sufficiently contrasting colour on a background image you should do one of two things:
- Place a translucent white or black (not grey) box behind the text. Apply some shadowing to the text. Use a contrasting colour from the background box you’ve just added. Your text should now be much more visible. (My advice: Don’t apply a border to the background box).
- Alternatively, for photos (which is typically when this situation arises): Add a solid white or black box behind the text. White is generally the better option. Make sure there is a hard line / hard distinction between the box you’ve added and the image. You can also make the box the full width or full height of the screen as a “band” of colour. You may need to resize your image but that’s preferable to having unreadable text!
- Never make text smaller than 12pt, preferably never smaller than 16pt
- Don’t assume your viewer will be watching in full screen. In fact, I suggest you make sure everything is easily readable even if your video is at 1/4 a typical screen size. That’s 480px wide at best! (This also corresponds to 480p video quality).
- When animating text, keep it to simple scale, rotate and move animations in order to retain a high quality look.
- Don’t place text on top of itself
- Don’t cramp too much text together - leave enough space between lines and words
- Always use sans-serif fonts. Also, if you want to help people with dyslexia and vision impairment, use one of the special fonts designed to help them!
- Use fades to bring text in and to take it out. Only slide text on/off screen if it is going to come back again later.
- Use short bits of text, not whole sentences. Max 5 words is a good target.
- Except if showing a quote or definition. In which case, allow enough time for viewers to read it in full without any audio (other than perhaps fill in music). As with diagrams, allow twice as long as you think the longest person might take.
Text is great when done well but can ruin a video completely, so be cautious - less is always more!
The Timeline
The video timeline is where all the video content is added and gets ordered. It’s also where you can add entrance/exit effects and audio/visual property animations.

TechSmith have lots of great tutorials on their website to help you learn how to use Camtasia’s features. You can learn pretty much everything there is to know about Camtasia in around 10 to 20 hours.
Before you start adding stuff to your timeline, you probably want to change the resolution of your video. In Camtasia, click the “1280x720” (or whatever size is shown) button in the top-left corner of the “viewing”/”playback” region. Select the resolution you want to edit at (“1920x1080” for Full HD, best for most YouTube videos).
You can also select the background colour of your video (in the video settings window where the size was set). For explainer videos which are based on diagrams and text, I usually use an off white such as 0xFDFDFD. For explainer videos that mostly contain screen recordings I sue a dark grey background (0x333333). For real-world video, I use a black background.
Start by adding your audio to the timeline. At this stage, open the Audio (/Sound) properties pane and turn on “Volume leveling” at “Low/Medium Volume Variation”. Also, increase the volume of your audio to the maximum possible without it sounding like clipping is occurring. Ensure your video is clearly audible even with your computer at 50% normal volume (as viewers devices vary massively in volume).
Your audio is going to set the main timeline and pace of your video.
The Camtasia library comes with a number of good pre-set intro and outro sequences. You could also make your own intro/outro sequence and add it to the library for use in future videos. Add an intro so that it lines up with the intro part of your narration. You may also wish to add some intro music. For best effect, fade out the music over 1.5 seconds and fade in your intro narration over 0.3 seconds, with the narration fade in happening around half a second after the music starts to fade out.
You should now have your intro and a long section of just audio. Now you can start going through your video and adding your visuals.
You may prefer to go through your whole video adding all the shapes, text, images, screen recordings and video clips without animation. You can then go back and add entrance/exit effects, animations and adjust timings to match the audio.
However, you may prefer to add all the exact timings, animations, effects, etc. to your content as you go through. I’m not convinced one approach is better than the other so this will be up to you to decide as you begin to practice editing.
Once you’ve built up all the content of your video, add your outro.
Production
You’ve done almost all the hard work for creating your video. This is the last “creation” step you have to do.
Produce your video using Camtasia at the highest quality possible. You’ll probably want to output straight to MP4 (not any of the other fancy formats or automatic upload services). This allows you to watch the video back after production to check the final rendered video is as expected. Sometimes you might find animations or images don’t quite come out as expected and you need to go back an edit.
Having produced your final MP4 file, save it somewhere sensible so you can find it again in future. It’s best practice to name it as “YYYY-MM-DD - Video name.mp4” where YYYY is the 4-digit year, MM is the 2-digit month and DD is the 2-digit day of the month. This naming scheme will always order usefully in file viewers (e.g. Windows Explorer) and month/day are less easily confused.
Watching it back
This is important - always watch your video back on your desktop/laptop and your mobile device. Ensure it looks and sounds as good as you expect. Any small errors should be corrected now - it’s your last chance. Videos uploaded to YouTube cannot be “replaced” with new versions, which means you can’t fix mistakes after you’ve published your video (unless you’re happy to lose the view count and any likes/comments).
Publishing
Publishing is fairly straightforward normally - just upload it to YouTube, give it a sensible name, tags and description. If you’re doing a series of videos, remember to include next and previous links in the description and create a playlist containing all the videos in the series.
Sharing
After you’ve published, remember to write a short article about it and post it to your various social media outlets. Try to get some early feedback from friends or “fans” to make sure your video is being well received.
Tips & Tricks
Creation time
It takes between 30 and 60 mins to create one minute of good quality video. This includes everything from planning, to script writing to production.
This breaks down as about 3 mins planning, 10 mins writing, 5 mins recording, 15 mins editing (video and audio) and 2 mins producing = ~35 mins.
Publishing/sharing can take a variable length of time depending on your internet connection’s upload speed and how much effort you go to with setting up the description and sharing your video.
Thanks for reading, please leave feedback
Thanks for reading this (relatively short?) guide. Hopefully now you have a better idea about how to create an explainer video and more confidence to give it a go.